Project Management System, Website & Using Git
Setting Up a Project Management System, Building a Website, and Using Git

Steps
- Tools
- Git
- GitLab/GitHub
- Visual Studio Code (VSC)
- Web Browser (Chrome, Firefox, etc.)
- SSH Key Generator (Terminal/Git Bash)
- FTP Client (Optional)
- HTML/CSS/JavaScript
- Website Template (Envato Elements or Free Templates)
- Google Fonts
- Favicon Generator (Optional)
- SVG Editor (Adobe Illustrator, Inkscape)
- Sketching/Design Tools (Figma, Adobe XD)
- Materials
- External Storage or Cloud Storage (Optional)
- Web Hosting Service (GitLab Pages/GitHub Pages)
- Domain Name (Optional)
Files
DownloadStep 01.
1. Introduction to Web Design and Version Control
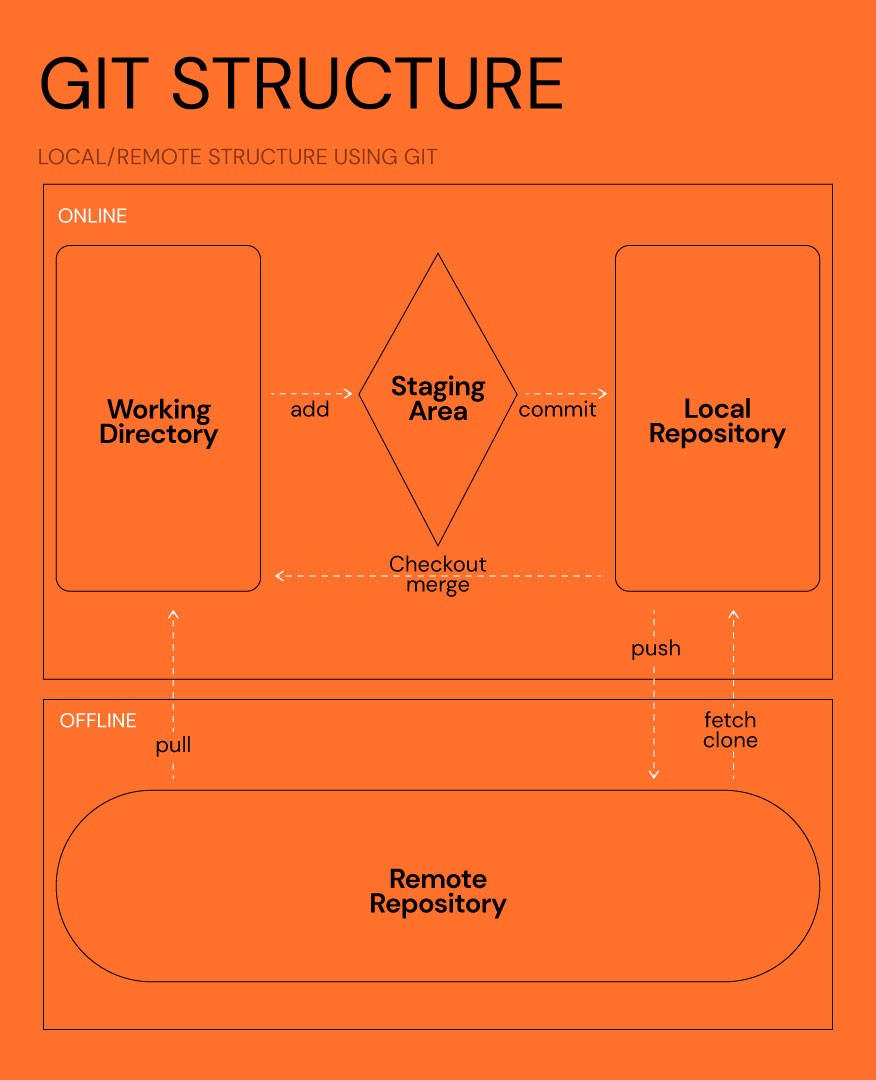
Version Control Concepts: Version control helps manage changes to documents and code over time. Instead of working on a file and saving different versions manually, version control software tracks changes automatically. It’s especially useful for collaborative work, allowing multiple users to contribute, review, and maintain a history of edits.
Git as a Distributed Version Control System: Git is a powerful version control tool that allows changes to be made locally on your system and later pushed to a shared repository (e.g., GitLab). It’s reliable, scalable, and open-source, making it ideal for collaborative projects.
Steps to Set Up Git:
Download Git:
Download Git for macOS.
Configure Git with User Information: Open your terminal and run the following commands to set your username and email globally for all local repositories:
git config --global user.name "Your Name"
git config --global user.email "youremail@example.com"
Record Events in Git: The basic workflow in Git involves initializing a project, adding files, committing changes, and pushing them to a remote repository. Here’s a quick setup:
git init      # Initializes a new Git repository in the project directory
cd <your_project_directory> # Navigates to your project folder
touch file.txt  # Creates a new file
git add file.txt  # Stages the file for commit
git commit -m "My first commit"  # Commits the changes with a message
git push  # Pushes the changes to the remote repository
Step 02.
2. Building My Website

Finding the Right Template: To build a website, I began by browsing templates, focusing on blog or portfolio themes to display my weekly assignments as a grid. I found a suitable template that had a simple, clean structure.
Understanding the Template Structure: The template I chose included multiple pages, each with a specific style and layout:
Index Page (Landing Page): A simple page with links to essential resources, the Fab Academy agreement, and a grid displaying weekly assignments.
Assignment Page: A minimalist photo grid, with week numbers and assignment names.
Weekly Assignment Page: Features a photo cover, a brief description, and assignment details structured in a blog format.
About Page: Includes my online CV, a short bio, and a profile photo.
Final Project Page: A variation of the assignment page, but with a distinct look to highlight its importance.
404 Page: A consistent design in case users encounter broken or dead links.
Step 03.
3. Setting Up and Editing the Website Using Visual Studio Code
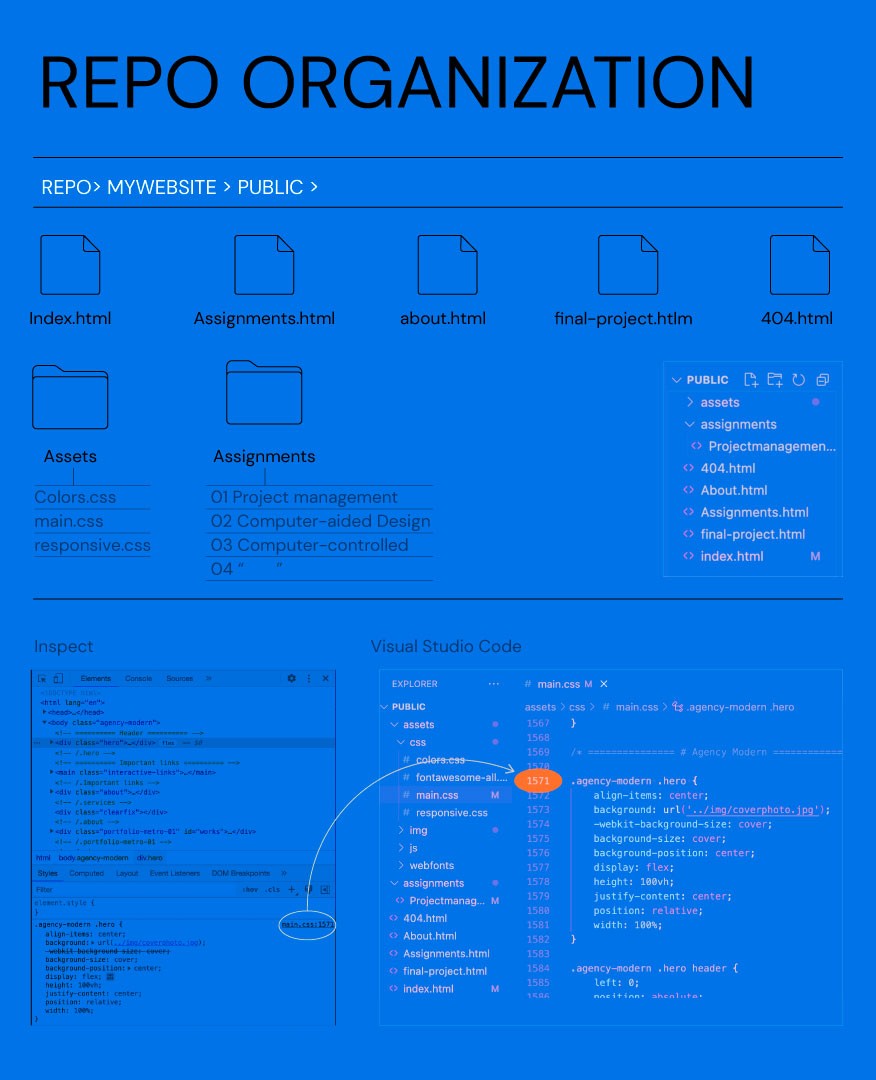
Visual Studio Code (VSC): VSC is a source code editor for desktop. Once installed, I opened the template folder in VSC by dragging the "public" folder from my local repository into the editor.
Editing the Template: I customized the template for my project using HTML and CSS:
Header (HTML <head>): Added meta tags such as character set, page description, and author information. Linked external and custom CSS files for styling the site.
External CSS: Managed styles such as fonts, colors, and padding through the CSS files included in the template.
Google Fonts: Chose the open-source DM Sans font for consistency throughout the website.
Favicon: Created a favicon using Adobe Illustrator, sized at 32x32px, and uploaded it to the website.
Website Body (HTML <body>):
Navigation: Added an SVG version of my name on the top-left corner of the page, with links to assignments, the final project, and an about page on the top-right.
Landing Page: Set a background image and added an H1 title with a button linking to weekly assignments.
Important Links Section: Created a section with links to resources I would frequently access.
Agreement Section: Listed the Fab Academy agreement in a styled list.
Grid Section: Modified the image grid by editing padding in the CSS file to match the template’s layout.
Footer: Included copyright text and social media links.
Step 04.
4. Setting Up Git for Project Management
Installing and Configuring Git: To check if Git was already installed, I used the terminal command: git version
If Git was installed, it would return the version number. If not, I installed it using the instructions mentioned earlier. Then I configured my username and email with these commands:
git config --global user.name "Your Name"
git config --global user.email "youremail@example.com"
Setting Up SSH Key for Secure GitHub Access: SSH keys provide a secure way to connect your local machine to GitHub. Follow these steps to set it up:
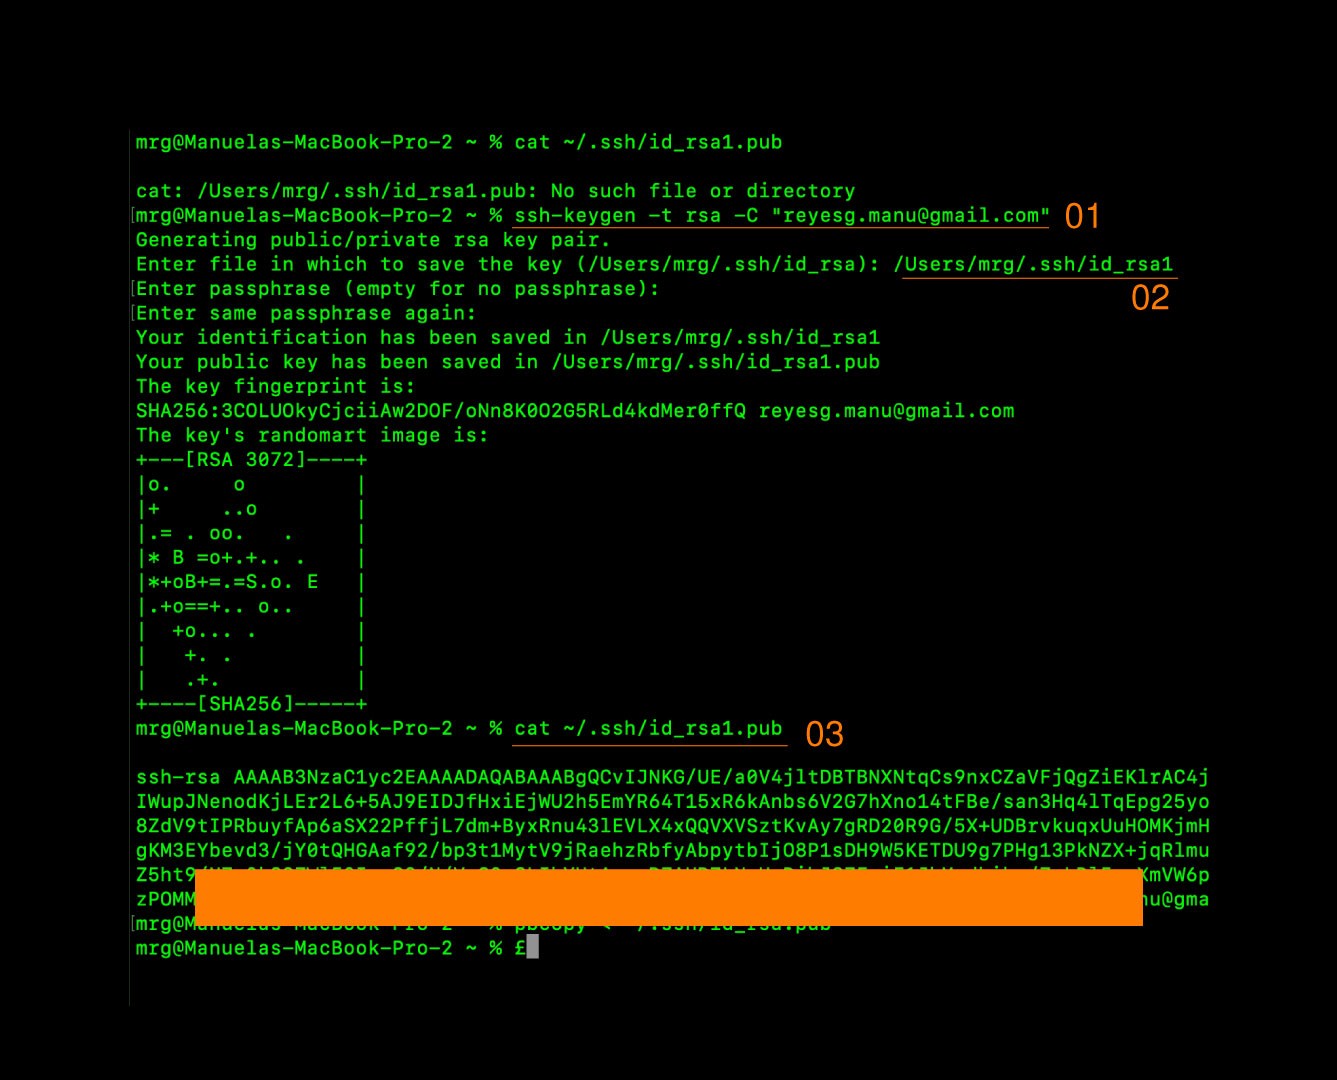
Check if an SSH key already exists:
cat ~/.ssh/id_rsa.pubGenerate a new SSH key (if one doesn’t exist):
ssh-keygen -t rsa -C "your_email@example.com"Add the SSH key to your GitHub account: After generating the key, you can view it with this command:
cat ~/.ssh/id_rsa.pubCopy the output and add it to your GitHub account under SSH keys.
Conclusion
By the end of this process, I will have configured Git for version control, selected and customized a website template, and set up a secure connection with GitHub for remote project management. This foundation will support the documentation of my work throughout the Fab Academy program.